
오늘은 저번 시간에 소개한 Cisco Packet Tracer를 이용해서 라우터끼리 연결하는 실습을 진행하겠습니다. 라우터 3개를 연결하여 각각 ip를 부여해준 뒤에 ping 테스트를 통해 잘 연결&설정 됐는지 확인하겠습니다.
조건
1. 라우터에 HostName 넣기
2. 각 장비에 배너 달기
==========================================
>>>Permitted Only Authorized Network Engineer!!!<<<
==========================================
3. 각 장비에 IP Address 넣기
4. 각 장비단 Interface에 Description 넣기
5. Username : CCNA, Password : CCNA
6. Ping 확인
실습
1. 라우터 배치
저번 시간에 배운대로 라우터 세 개를 배치해 주도록 합니다.

2. 케이블 연결

같은 장비끼리는
Cross cable을 연결해줍니다.

3. 네트워크 대역 지정
이 부분은 가상 실습 중이니 마음껏 설정해 주면 됩니다. 저는 다음 그림과 같이 할당해 줬습니다. 라우터 이름도 같이 지정해 주도록 합니다.

4. 순서대로 설정해 주기
R1부터 설정해 주도록 하겠습니다.
CLI까지 진입했으면 다음과 같은 순서로 진행해 주세요.
R1
Router>enable
Router#configure terminal
Enter configuration commands, one per line.  End with CNTL/Z.
Router(config)#hostname R1
R1(config)#banner motd ^
Enter TEXT message.  End with the character '^'.
======================================================
>>> Permitted Only Authorized Network Engineer !!! <<<
======================================================
^

R1(config)#interface fastEthernet 0/0
R1(config-if)#ip address 10.1.1.1 255.255.255.0
R1(config-if)#description TO_R2_fa0/0
R1(config-if)#no shutdown


%LINK-5-CHANGED: Interface FastEthernet0/0, changed state to up
R1(config-if)#
R1(config-if)#exit
R1(config)#interface fastEthernet 0/1
R1(config-if)#ip address 30.1.1.1 255.255.255.0
R1(config-if)#description TO_R3_fa0/0
R1(config-if)#no shutdown


%LINK-5-CHANGED: Interface FastEthernet0/1, changed state to up
R1(config-if)#exit
R1(config)#username CCNA password CCNA
R1(config)#exit
R1#
%SYS-5-CONFIG_I: Configured from console by console

R1#copy running-config startup-config
Destination filename [startup-config]?
Building configuration...
[OK]
R1#reload


Self decompressing the image :
########################################################################## [OK]
              Restricted Rights Legend


======================================================
>>> Permitted Only Authorized Network Engineer !!! <<<
======================================================


R1>
R2
Router>enable
Router#configure terminal
Enter configuration commands, one per line.  End with CNTL/Z.
Router(config)#hostname R2
R2(config)#banner motd ^
Enter TEXT message.  End with the character '^'.
======================================================
>>> Permitted Only Authorized Network Engineer !!! <<<
======================================================
^

R2(config)#interface fastEthernet 0/0
R2(config-if)#ip address 10.1.1.2 255.255.255.0
R2(config-if)#description TO_R1_fa0/0
R2(config-if)#no shutdown


%LINK-5-CHANGED: Interface FastEthernet0/0, changed state to up
R2(config-if)#
R2(config-if)#exit
R2(config)#interface fastEthernet 0/1
R2(config-if)#ip address 20.1.1.1 255.255.255.0
R2(config-if)#description TO_R3_fa0/1
R2(config-if)#no shutdown


%LINK-5-CHANGED: Interface FastEthernet0/1, changed state to up
R2(config-if)#exit
R2(config)#username CCNA password CCNA
R2(config)#exit
R2#
%SYS-5-CONFIG_I: Configured from console by console

R2#copy running-config startup-config
Destination filename [startup-config]?
Building configuration...
[OK]
R2#reload


Self decompressing the image :
########################################################################## [OK]
              Restricted Rights Legend


======================================================
>>> Permitted Only Authorized Network Engineer !!! <<<
======================================================


R2>
여기까지 완료했으면 아이콘에 변화가 생겼을 겁니다.

바로 위 그림처럼 붉었던 점이 초록색으로 변한 것이죠. 저 라인의 양 IP Address를 설정해 준 덕분입니다.
R3
Router>enable
Router#configure terminal
Enter configuration commands, one per line.  End with CNTL/Z.
Router(config)#hostname R3
R3(config)#banner motd ^
Enter TEXT message.  End with the character '^'.
======================================================
>>> Permitted Only Authorized Network Engineer !!! <<<
======================================================
^

R3(config)#interface fastEthernet 0/0
R3(config-if)#ip address 30.1.1.2 255.255.255.0
R3(config-if)#description TO_R1_fa0/1
R3(config-if)#no shutdown


%LINK-5-CHANGED: Interface FastEthernet0/0, changed state to up
R3(config-if)#
R3(config-if)#exit
R3(config)#interface fastEthernet 0/1
R3(config-if)#ip address 20.1.1.2 255.255.255.0
R3(config-if)#description TO_R2_fa0/1
R3(config-if)#no shutdown


%LINK-5-CHANGED: Interface FastEthernet0/1, changed state to up
R3(config-if)#exit
R3(config)#username CCNA password CCNA
R3(config)#exit
R3#
%SYS-5-CONFIG_I: Configured from console by console

R3#copy running-config startup-config
Destination filename [startup-config]?
Building configuration...
[OK]
R3#reload


Self decompressing the image :
########################################################################## [OK]
              Restricted Rights Legend


======================================================
>>> Permitted Only Authorized Network Engineer !!! <<<
======================================================


R3>
이제 아이콘 화면을 보면 모두 초록불로 물든 것을 확인하실 수 있을 겁니다.

이로써 ping 만 남은 상태가 됐습니다. ping 전송은 쉽습니다.
5. Ping 테스트

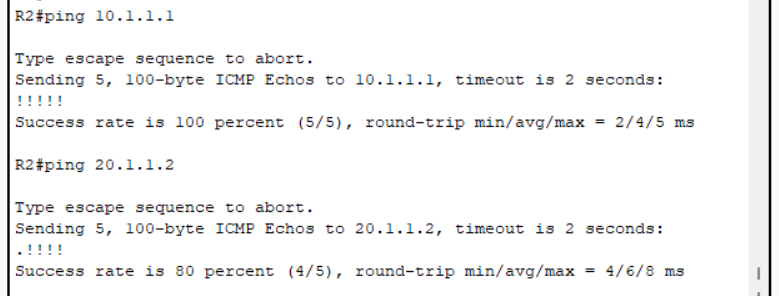

순서대로 각 양쪽에 ping을 보낸 결과입니다. 이렇게 3개의 라우터가 성공적으로 연결됐습니다!
다음 시간엔 DHCP 설정을 알아보는 시간을 가지도록 하겠습니다.
감사합니다.